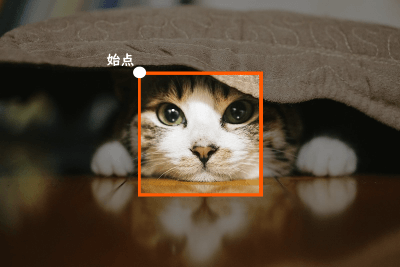
PHPのGDライブラリを使って、元画像の縦横中央を基準点にしたサムネイル画像を作成する方法の紹介です。
この記事の内容は、元画像のアスペクト比に関係なく縦横の中央を基準点に切り出し、サムネイルサイズは固定の正方形または長方形となるようにするが画像の伸縮はさせない、という感じです。
サンプルの元画像に利用する画像はこちらの猫ちゃんにしました。
画像のサイズは 横800px 縦533px となっています。

切り出しバージョン
元画像の縦横中央を基準点にサムネイルサイズで切り出すバージョンです。

処理の結果はこのようになり、元画像のサイズに関係なくサムネイルサイズで切り出しています。

元画像の大きさ次第では全体のいち部分しか捉えられなくなりますので、大きな画像や小さな画像など様々な画像をサムネイル化する場合には、不向きです。
元画像のサイズがブログのアイキャッチ画像などある程度決まった範囲内のものなら、この方法で対応できると思います。
// サムネイルサイズ
$thum_w = 250;
$thum_h = 250;

// 元画像ファイル
$file = 'sample.jpg';

// 元画像ファイルサイズ
list($moto_w, $moto_h) = getimagesize($file);

// 元画像ファイルタイプ
$file_type = mime_content_type($file);

// 元画像の中央の座標
$moto_cx = $moto_w / 2;
$moto_cy = $moto_h / 2;

// 元画像の始点にする座標
$moto_x = $moto_cx - ($thum_w / 2);
$moto_y = $moto_cy - ($thum_h / 2);

// サムネイルサイズでベース画像データ作成
$thum_img = imagecreatetruecolor($thum_w, $thum_h);

// 元画像のファイルタイプで判別して元画像データ作成
switch ($file_type) {

	case 'image/jpeg':
		$moto_img = imagecreatefromjpeg($file);
		break;

	case 'image/png':
		$moto_img = imagecreatefrompng($file);
		break;

	case 'image/gif':
		$moto_img = imagecreatefromgif($file);
		break;

}

// ベース画像データに元画像データをリサイズして合成
imagecopyresampled($thum_img, $moto_img, 0, 0, $moto_x, $moto_y, $thum_w, $thum_h, $thum_w, $thum_h);

// 指定のフォーマットで画像を保存
imagepng($thum_img, 'thum.png');
imagejpeg($thum_img, 'thum.jpg');
imagegif($thum_img, 'thum.gif');
imagewebp($thum_img, 'thum.webp');

// 画像データをメモリから削除
imagedestroy($moto_img);
imagedestroy($thum_img);
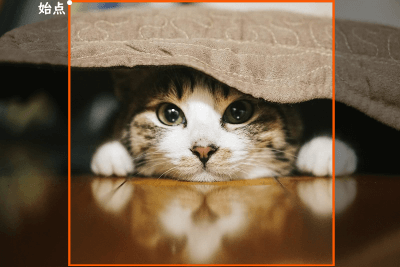
短い方の辺に合わせて切り出すバージョン
単純に切り出すだけですと、他より大きい元画像があった場合にイマイチな結果になります。
そういった時は、短い方の辺にあわせてリサイズしつつ、サムネイルサイズに切り出すのが理想に近いサムネイルかと思います。
サンプルにした画像は横長(縦辺が短い)な画像なので、縦幅は最大に切り出してサムネイルサイズの正方形に合うように横幅は縦幅と同じサイズにして中央を基準点にして切り出しています。

サムネイル画像はちゃんと指定したサムネイルサイズ(サンプルでは250×250)になっていることが確認できます。

// サムネイルサイズ
$thum_w = 250;
$thum_h = 250;

// 元画像ファイル
$file = 'sample.jpg';

// 元画像ファイルサイズ
list($moto_w, $moto_h) = getimagesize($file);

// 元画像ファイルタイプ
$file_type = mime_content_type($file);

// 元画像の中央の座標
$moto_cx = $moto_w / 2;
$moto_cy = $moto_h / 2;

if ($moto_w <= $moto_h) {
	// 横サイズの方が小さい場合
	$resize_w = $moto_w;
	$resize_h = $moto_w;
	$x = 0;
	$y = $moto_cy - ($moto_w / 2);
} else {
	// 縦サイズの方が小さい場合
	$resize_w = $moto_h;
	$resize_h = $moto_h;
	$moto_x = $moto_cx - ($moto_h / 2);
	$moto_y = 0;
}

// サムネイルサイズでベース画像データ作成
$thum_img = imagecreatetruecolor($thum_w, $thum_h);


// 元画像のファイルタイプで判別して元画像データ作成
switch ($file_type) {

	case 'image/jpeg':
		$moto_img = imagecreatefromjpeg($file);
		break;

	case 'image/png':
		$moto_img = imagecreatefrompng($file);
		break;

	case 'image/gif':
		$moto_img = imagecreatefromgif($file);
		break;

}

// ベース画像データに元画像データをリサイズして合成
imagecopyresampled($thum_img, $moto_img, 0, 0, $moto_x, $moto_y, $thum_w, $thum_h, $resize_w, $resize_h);

// 指定のフォーマットで画像を保存
imagepng($thum_img, 'thum.png');
imagejpeg($thum_img, 'thum.jpg');
imagegif($thum_img, 'thum.gif');
imagewebp($thum_img, 'thum.webp');

// 画像データをメモリから削除
imagedestroy($moto_img);
imagedestroy($thum_img);
ありがとうございます。参考になりました。
リサイズ切り出しバージョンが動かなかったので少し変更してみました。
//サムネイルサイズ
$thum_w = 200;
$thum_h = 150;
//元画像ファイル
$file = $image_url;
//元画像ファイルサイズ, 元画像ファイルタイプ
list($moto_w, $moto_h, $file_type) = getimagesize($file);
//元画像の中央の座標
$moto_cx = $moto_w / 2;
$moto_cy = $moto_h / 2;
if($moto_w <= $moto_h){
//横サイズの方が小さい場合
$resize_w = $moto_w;
$resize_h = $moto_w;
$moto_x = 0;
$moto_y = ($moto_cy – $moto_w) / 2;
}else{
//縦サイズの方が小さい場合
$resize_w = $moto_h;
$resize_h = $moto_h;
$moto_x = ($moto_cx – $moto_h) / 2;
$moto_y = 0;
}
//サムネイルサイズでベース画像データ作成
$thum_img = imagecreatetruecolor($thum_w, $thum_h);
//元画像のファイルタイプで判別して元画像データ作成
switch ($file_type) {
case IMAGETYPE_JPEG:
$moto_img = imagecreatefromjpeg($file);
break;
case IMAGETYPE_PNG:
$moto_img = imagecreatefrompng($file);
break;
case IMAGETYPE_GIF:
$moto_img = imagecreatefromgif($file);
break;
}
//ベース画像データに元画像データをリサイズして合成
imagecopyresampled($thum_img, $moto_img, 0, 0, $moto_x, $moto_y, $thum_w, $thum_h, $resize_w, $resize_h);
//指定のフォーマットで画像を保存
imagejpeg($thum_img, $save_path);
//画像データをメモリから削除
imagedestroy($moto_img);
imagedestroy($thum_img);